Feedsack Memories
Sometimes memories pop up unexpectedly. I recently had a vivid recollection of my grandmother’s formica kitchen table covered in what are now considered vintage linens. The old refrigerator had the galvanized aluminum ice trays in the freezer with the removable separators. Every sensory experience of that moment is so clear to me and I don’t think I was but about age four. Five at the oldest given the house they lived in.
Something about that time in my life has stuck with me and as a young woman I regularly frequented antique shops and flea markets. The quilts and textiles always caught my attention.
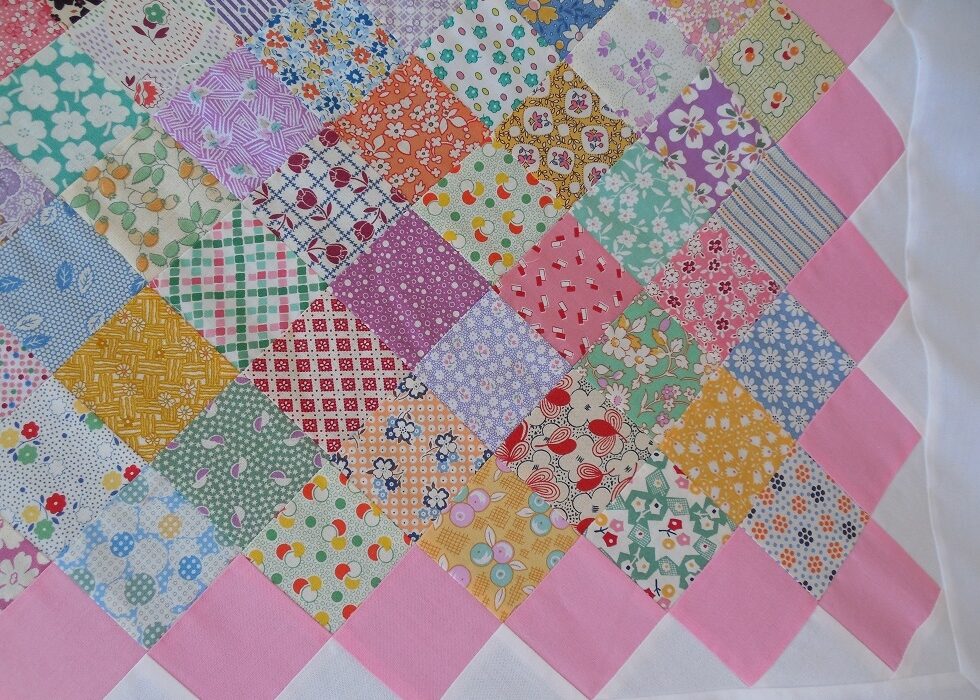
Several years ago I saved a photo of a vintage quilt that I saw in a Facebook group. It was a postage stamp quilt made from feedsacks. The background was white and it had pink accent squares. Something about this photo spoke to me.
 This was at the height of my 1930’s fabric reproduction craze and the pattern looked so simple. By this point I had been in several swaps and had quite a stash of 1930’s reproduction strips and squares saved. This was the perfect project for those prints.
For my background I chose a Kona basic white cotton. Primarily because I had purchased several yards at a steep discount and it was asking to be used.
I purchased a variety of pinks until I found just the right hue. It just happened to be from the Marcus Brother’s 1930’s coordinates line. This Kona Peony is the closest I can find online that is still available.
Scrappy Feedsack Memories Quilt / Pattern by Nakeytoes Quilting
Fabrics used: Kona White / Kona Peony/ Assorted 1930’s reproductions
Finished quilt size: 107″ square
Materials Needed
6 3/4 yards white fabric
1-1/2 yards pink accent fabric
6-3/4 yards white background fabric
1 yard binding fabric
9 yards backing fabric
120″ x 120″ cotton batting
Cutting
1. From the white fabric cut the following:
– (4) 53″ x 8.5″ rectangles
– (4) 86″ x 4.5″ rectangles
– (4) 107″ x 4.5″ rectangles
– (132) 2 7/8″ squares, sub-cut in half to form triangles
– (1) 3.25″ square, cut corner to corner in both directions to form 4 triangles
2. From the pink fabric cut the following:
– (280) 2.5. x 2.5″ squares
3. From scrap fabric cut the following:
– (1105) 2.5″ squares
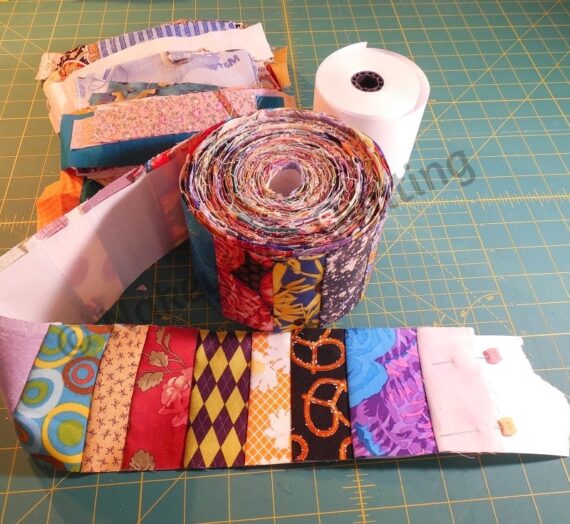
 I started by cutting what seemed like thousands of 2 1/2″ squares from my various 1930’s reproductions, though in reality it was only several hundred. Variety was what I wanted. In retrospect, I should have sewn several 2 1/2″ strips together and sub-cut them into strip sets. Doing it the way I did, I definitely have a scrappier look.
When I thought I had enough squares, I prepped my sewing machine and then sat and chain stitched dozens of the squares together. This is a really great project if you need some mindless sewing or only have a few minutes to sit at your machine.
 As time allowed, I sewed sets of two together, then sets of four and so on.
Having a design wall for this project made it so much easier to keep track of this project. Because of the alternating rows you can easily see how many more you need for each strip set.
Once your strip sets have the correct amount of squares for the length you need, attach a pink square to each end.
Repeat with a background triangle making sure to attach it with the 45 degree angle facing the correct direction. There was so much time spent frogging (rip it, rip it) because I wasn’t paying attention.

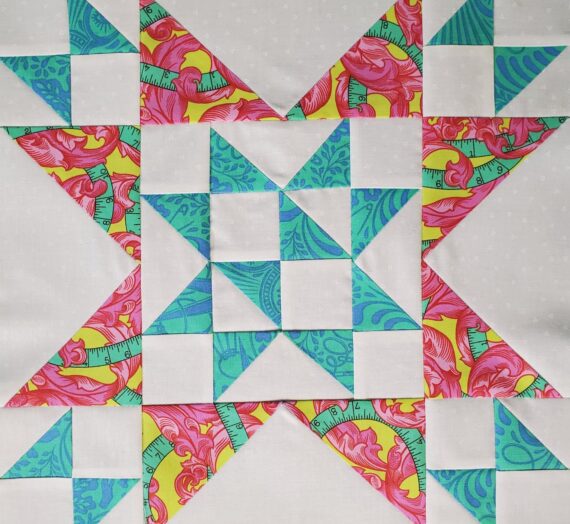
 Looking at the diagram, lay out your finished strip sets and stitch them together until you have five triangles with the longest strip set having 23 printed squares and one triangle with a strip set of 21 printed squares.
Take one triangle with 23 squares and the triangle with 21 squares and, matching seams, stitch them together to form a large square. This will become your center medallion.
On each medallion corner stitch one of the triangles made from the 3 1/4″ square.
For the first border you will take your four 53″x8 1/2″ strips and lay them out on your cutting mat. Along one side of each border piece you need to make a mark at 8 1/4″ and another at 44 3/4″ (or if your table isn’t long enough, 8 1/4″ from either end, just make sure both marks are on the same long edge). The distance between the two marks should be 36 1/2″.
To create mitered corners, you want to make a 45* cut from the corners of the long side of your border to what will become the short side bordering your center medallion. Using the 45* angle line on your ruler, lay it align it on either long edge and use the edge of the ruler to create the 45* line on your fabric. Line up the outside edge with the corner at the top and the 8 1/4″ mark at the bottom creating a 45 degree line. Carefully make your cut. Place the ruler at the other end of the strip and use the opposite edge to make a 45 degree cut going the other direction.
 Stitch your four border pieces to the center medallion using 1/4″ seam allowance. Using the tutorial for Perfect Y Seams, stitch your mitered corners and press. They should look like this when finished. I didn’t notice until I uploaded the photo the nice little arrow pointing to the next border.
The next step is to add the four remaining triangle units. Your quilt top just grew dramatically!
Once the pieced triangle units are attached, using the above method, take your 86″x4 1/2″ strips and attach them. By now your quilt should measure 86″ square. You may choose to stop at this point or continue with the next two rounds.
 For the pieced border you will need 132 pieced strips made from 264 printed squares, 132 pink squares and 264 background triangles. Press all seams in the same direction and they should nest nicely when assembling the borders.
To make these strip sets you will start by chain piecing one 2 1/2″ printed square to one 2 1/2″ pink square until you have 132 of them. Attach the remaining printed squares to the opposite side of the pink square. Press.
Alternately, you can take two 2 1/2″ strips of your prints and one 2 1/2″ strip of pink and create strip sets that you can sub cut into 2 1/2″x6 1/2″ for faster piecing.
For the background triangles, take half of your stack and attach them to one end of each of your strip sets, all facing the same direction. Press.
 Flip the strip sets around and attach the remaining half the same way. Press. You should now have 132 complete strip sets that look like the photo to the left.
Separate your strip sets into four piles of 33. Take two of the strips set and laying them right sides together with seams nesting (flip one around if they don’t nest), sew them together. NOTE: when pinning them together, the prints are going to be off set to factor in the straight edge of the background triangle. I spent a long frogging session because I didn’t check to make sure it looked right before adding the third strip set. Looking at the border photo above the pattern should be: Free triangle, print to triangle, pink to print, print to pink, triangle to print, free triangle. Make sense? If not, let me know.
Repeat with the remaining strips sets until you have four long borders.
Press them well and using the Perfect Y Seam method, attach them to your quilt.
You’re almost there! Just one more border. Think of this project like a round robin.
 Take your 107″ x 4 1/2″ strips and attach them the same way you did the previous two white borders. For whatever reason, I didn’t miter this last border. I just attached two sides and then attached the other two sides.
If you don’t want to miter any of your corners, you can use this method for all of your borders. You just need to make sure to measure the quilt body before cutting your strips and make sure to cut all strips the same length. I learned that the hard way. I didn’t measure my first two strips and as you can see from the final picture, it’s a bit wavy. I couldn’t figure out what was going on as the quilt progressed so I asked more advanced quilters about it. Lesson learned.
Something else I learned while making this quilt is that when you have this many seams in a quilt, waviness occurs. Magic Sizing, spray starch or Best Press is your friend. Trust me! I prefer the Best Press because it doesn’t discolor my fabric like starch can, however, it can be a bit pricey. The Magic Sizing is my next choice, and generally what I use, for the same reason and it’s inexpensive.
As a side note, if y’all need to calculate how much yardage you need for a project, I used this yardage chart from the Clark County Quilters.
Disclaimer: I am an affiliate with Amazon and various other retailers. As such, I receive a small commission from any purchase made through my site. This is no way changes the cost of your item, but does help support this site. Thank you for your patronage.